- Getting Started
- Field Types
- Email Notifications
-
Integrations
- MailerLite
- Create User Accounts with Convert Forms
- MailChimp
- HubSpot
- GetResponse
- AcyMailing
- Content App
- Webhooks Addon
- Facebook Meta Pixel
- Google Adwords
- Sync submissions with your favorite app
- Drip Ecommerce CRM
- Google Analytics
- Constant Contact
- SalesForce Web-to-Lead
- IContact
- Zoho CRM
- Elastic Email
- Zoho Campaigns
- Zapier
- ConvertKit
- Brevo (Sendinblue)
- Campaign Monitor
- AWeber
- ActiveCampaign
-
Functionality
- Scroll the Page to the Top When a Long Form is Submitted
- Display Submissions Count for a Specific Form
- Populate Drop Down, Radio Buttons or Checkboxes with a CSV File
- Automatically Delete Submissions Older Than X Days
- Silently POST Submitted Data to Any API or URL
- Automatically Save Each Submission to a JSON file
- Authenticate and Login a User with a Custom Joomla Form
- Auto-Populate a Form Field with an Article Data
- Add a placeholder text to a Dropdown
- Create Multilingual Forms in Joomla
- Create a custom Joomla User Registration Form
- Redirect User to a URL After Form Submission
- Export and Import Forms across different Websites
- Export Form Submissions to CSV
- Convert Forms
- Styling and Customization
- Payment Forms
- Advanced Features
- Developers
- Troubleshooting and Support
-
Spam, Security & Compliance
- Enforcing a Custom Password Policy in Convert Forms
- Add Cloudflare Turnstile to your Joomla Form
- Implement the Iubenda Consent Database in Joomla with Convert Forms
- Add Custom Validations to Fields and Forms
- Add Math Captcha to your Form
- Prevent a Field From Saving in the Database
- Add hCaptcha to your Form
- Enable Double Opt-in
- Allow Form Submissions in Specific Date Range
- Ensure a Unique Value is Entered Into a
- Block Form Submissions Containing Profanity (Bad Words)
- Block Email Addresses or Email Domains
- Native Convert Forms Anti-spam Protection with Honeypot
- Add reCAPTCHA to your Form
- Create GDPR Compliant Forms
Copy Value From One Field to Another
Efficiency in form management is crucial, and the "Copy Value From" functionality in Convert Forms is your key to streamlined data handling. Transferring field values enables you to enhance user interactions, ensuring a more dynamic and personalized form-filling experience. This feature simplifies complex data workflows, saving users valuable time and optimizing the overall efficiency of your form-building process with your Joomla contact form.
Table of Contents
- How it Works
- Copying One Field to Another Field
- Copying Multiple Field Values Conditionally
- Copying Field Value with Custom Formulas
How it Works
Before diving into the magic of field value copying, ensure your setup aligns with the prerequisites:
- Convert Forms Pro
- The Conditional Fields plugin must be installed and enabled.
- A Javascript-enabled browser.
We need to set up conditions in the Conditional Fields section to copy field values in Convert Forms.

Copying One Field to Another Field
This example demonstrates the base functionality. Our form has two textboxes: "Favorite Word” and “Auto-copied word”. Whenever someone fills in the “Favorite Word” field, we want to copy its value to the “Auto-copied Word”.
To do so, open up Conditional Fields.
- Click “Add condition”.
- Select the field “Word” in the 1st dropdown.
- Select the “Updates” comparison operator in the 2nd dropdown.
Next, in the “Do” section
- Select “Favorite Word” as the target field in the 1st dropdown.
- Select the “Copy Value Form” action in the 2nd dropdown.
- Select the field “Word” as the value in the 3rd dropdown.
The settings of our condition will look like this:

Copying Multiple Field Values Conditionally
The preceding example illustrated how to copy field values when the source field changes.
However, there are instances where we want to copy values only under specific conditions, such as when a checkbox is clicked and checked.
To accomplish this, rather than relying on the "Updates" comparison operator that triggers whenever the field value changes, we employ other operators that compare the field value against specified criteria.
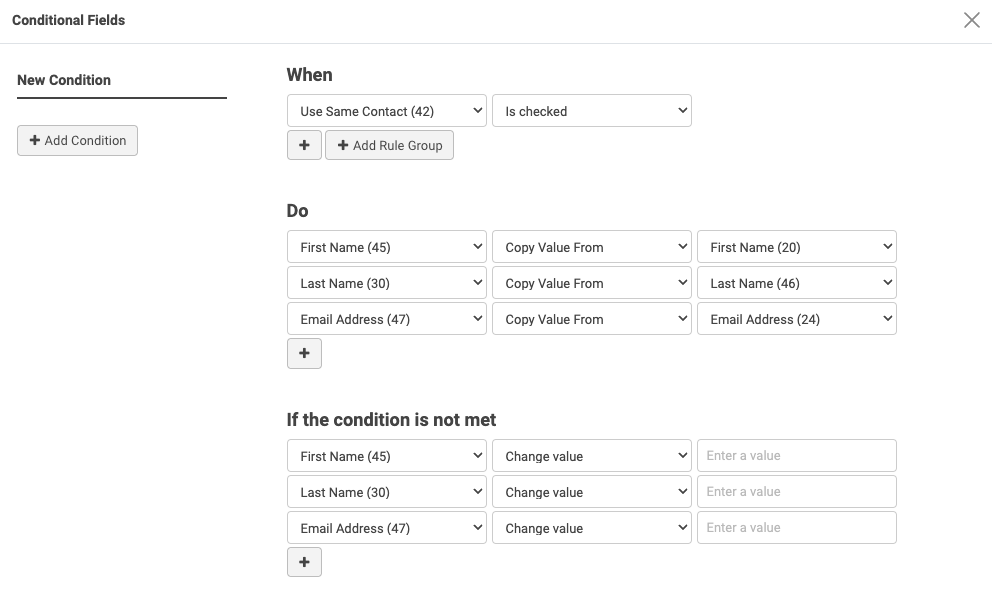
For example, to copy a field value only when a checkbox is checked, utilize the "Is Checked" operator. This ensures the copying action is contingent upon fulfilling the specified condition.
The settings of our condition will look like this:

To learn more about setting conditions, visit How to Setup Conditional Fields doc.
Copying Field Value with Custom Formulas
The "Copy Value From" action allows us to choose a single field. However, there are scenarios where simply copying the field value falls short. What if we need to copy multiple field values or add custom text, such as a prefix or suffix, to the field value? We can achieve this by employing the "Change Value" action with the Smart Tag {field.NAME}.
Let's delve into some examples.
Concatenating Multiple Field Values Into One Field
Imagine our form includes fields like First Name, Last Name, and Full Name. We want to automatically combine the values of First Name and Last Name into the Full Name whenever someone updates them. For instance, entering "John" and "Doe" in the First Name and Last Name fields, respectively, should result in the Full Name displaying "John Doe."
Here's how you can set this up:
- To do so, open up Conditional Fields.
- Click “Add condition”.
- Choose “First Name” in the 1st dropdown.
- Select the “Updates” comparison operator in the 2nd dropdown.
- Click “Add Rule Group”.
- Choose “Last Name” in the 1st dropdown.
- Select the “Updates” comparison operator in the 2nd dropdown.
Next, in the Do section
- Select “Full Name” as the target field in the 1st dropdown.
- Choose the “Change Value” action in the 2nd dropdown.
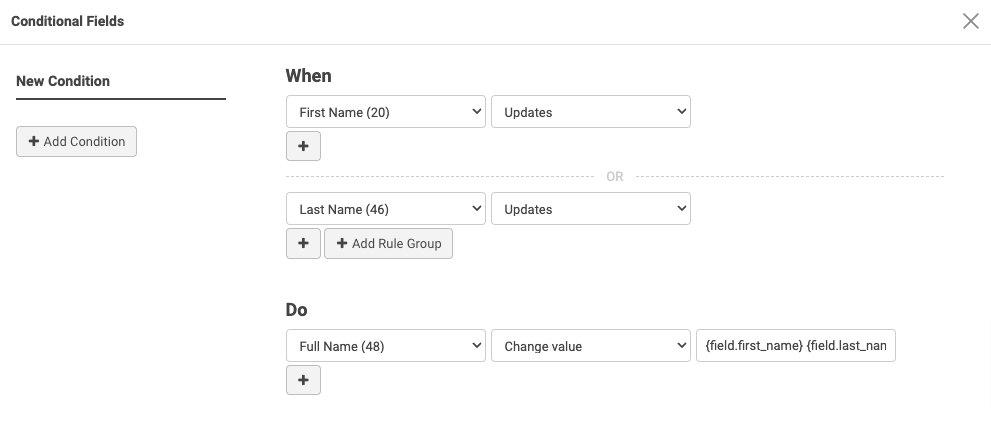
- Set the value to “{field.first_name} {field.last_name}”
The settings of our condition will look like this:

Here, first_name and last_name are the names of the corresponding fields on our form.
Appending or Prepending Text to Field Value
In the previous example, we saw how to concatenate two field values. Let's customize the Full Name field to say, "My name is John Doe."
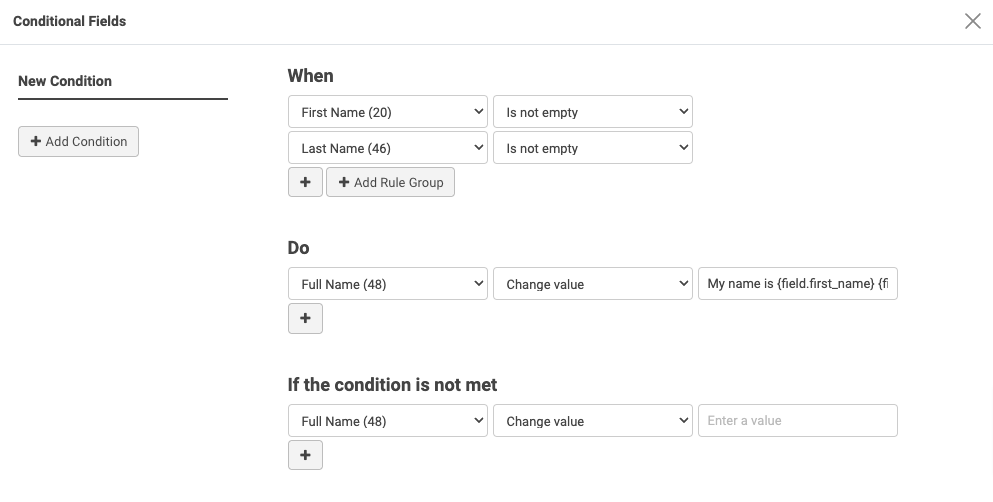
Open up Conditional Fields. In the “Do” section, change the value of the 3rd option to “My name is {field.first_name} {field.last_name}”.
The settings of our condition will look like this:


 Rated: